
TechDoc's SAML authenticator has provided our users with a quick, easy, and unified Single Sign-On experience for years using the SAML (Security Assertion Markup Language) standard. As times have evolved, so has authentication. Over the last few years, the OpenID (OIDC) protocol has moved into the spotlight as the modern replacement for SAML. OIDC 1.0 is built upon OAuth 2.0 the current and mature version of the original OAuth 1.0 (Open Authorization) standard. TechDoc 12 now features a new OIDC authenticator that supports many of the current OIDC identity providers (IDPs) available including Microsoft Entra (formerly Azure Active Directory). Entra includes both shared secret authentication as well as public/private key certificate-based authentication; the TechDoc OIDC authenticator supports both of these OIDC authentication methods. We'll go over the steps needed to configure both sides (TechDoc and Entra) and go over both authentication scenarios (shared secret and certificate-based authentication).
Note: This tutorial has been written specifically for Entra (as of 8/13/26) and the steps required and screenshots below are subject to change.
Application Registration in Entra
In order to use Entra as an OIDC identity provider for a TechDoc DM or SM, we'll need to create an application registration. After the application registration is created, you can set up your security mechanism(s) and then it will be ready for use.
- We'll first start by creating the application registration for your TechDoc instance on Entra. Open a web browser and log into your account on Entra.
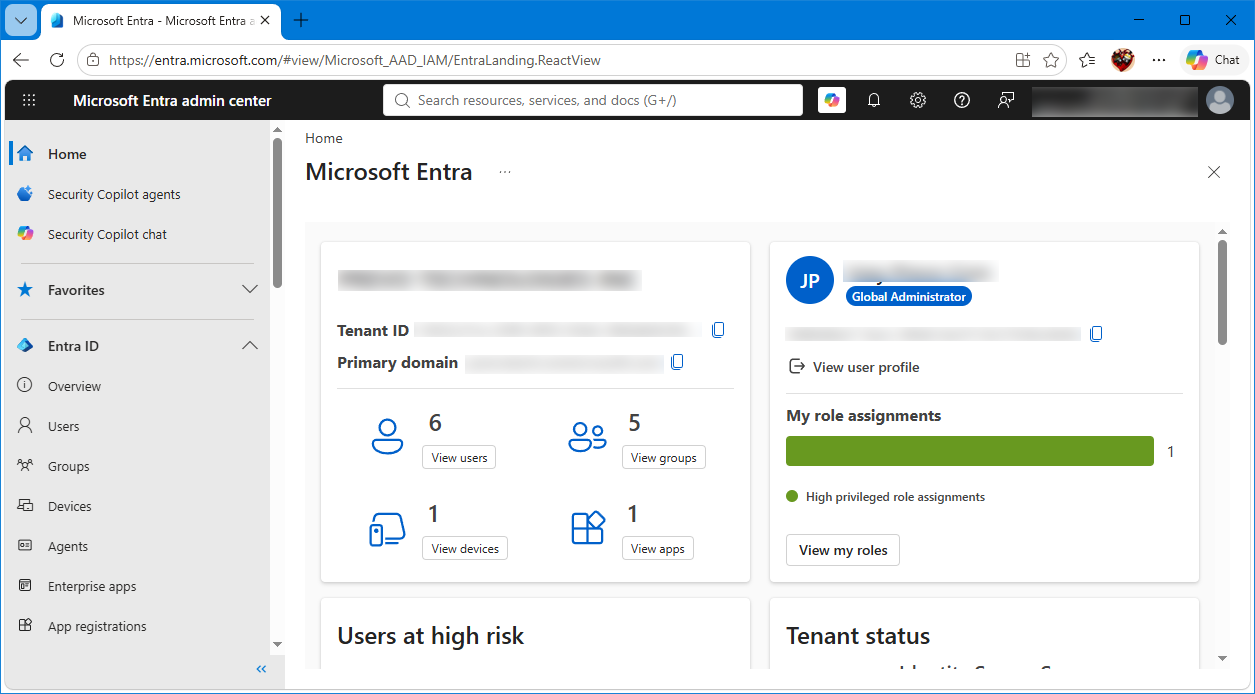
- On the main Entra home page, click the "App registrations" link on the left side menu.
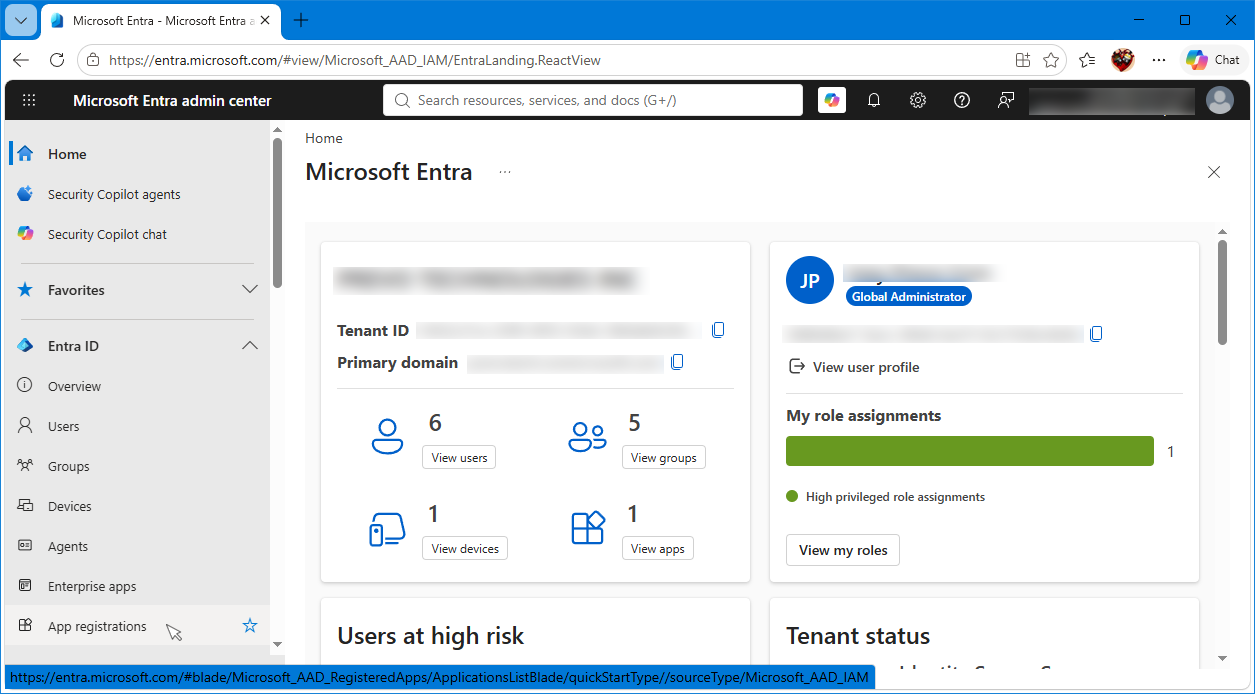
- On the App registrations page, click the "New registration" link.
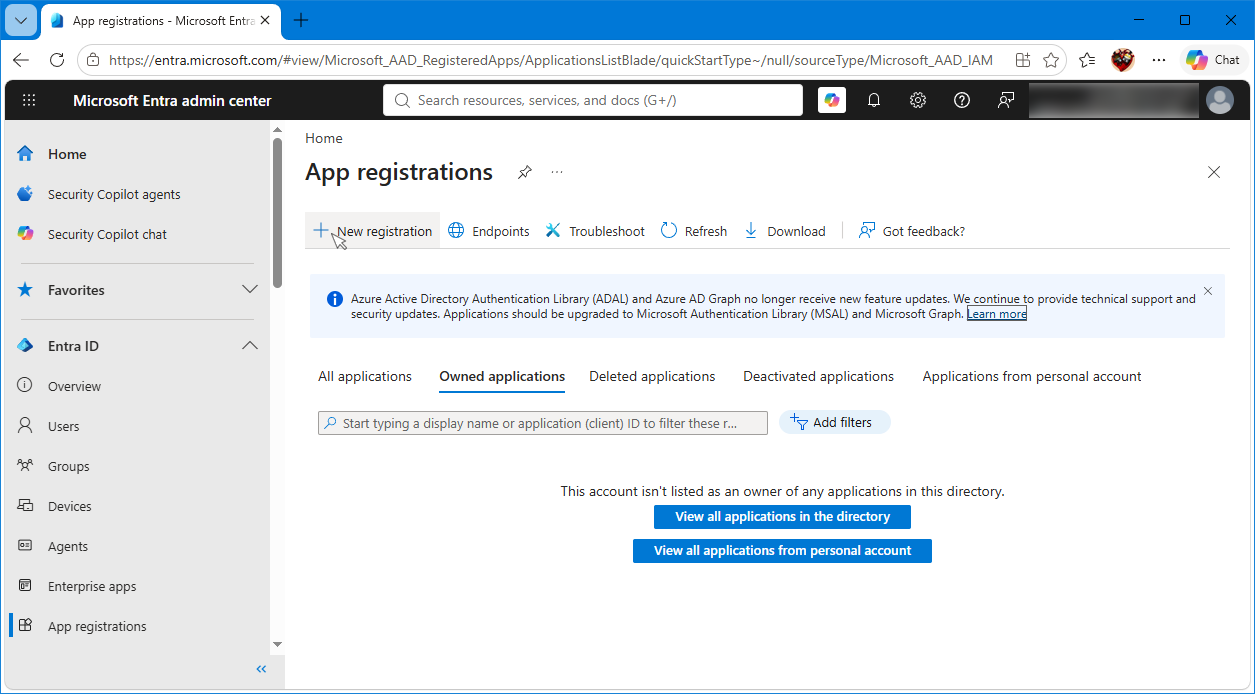
- On the Register an application page, enter the name you want to use for your TechDoc DM or SM instance; we chose "TechDocInstanceExample". Select the account type that you want this application registration to be a part of (this will vary depending on the number and types of accounts your organization has); for this example, we are using a basic Single tenant only account. Finally, under the Redirect URI section, select Web and enter the redirect URL for your TechDoc DM or SM instance. The redirect URL should be specified as:
https://YOUR_TECHDOC_INSTANCE/servlet/td.web.OIDCRedirector
Replacing YOUR_TECHDOC_INSTANCE with the full host name of your TechDoc DM or SM instance. Click the Register button to complete the application registration.
- After the application registration has completed, you'll be looking at the application registration's home page. On this page, you can find all of the information about your application registration. Before we move on, create a text file and note the Application (client) ID and the Directory (tenant) ID (shown in the areas highlighted in the red and blue boxes in the screenshot below). The client ID and tenant ID will be needed when configuring TechDoc.
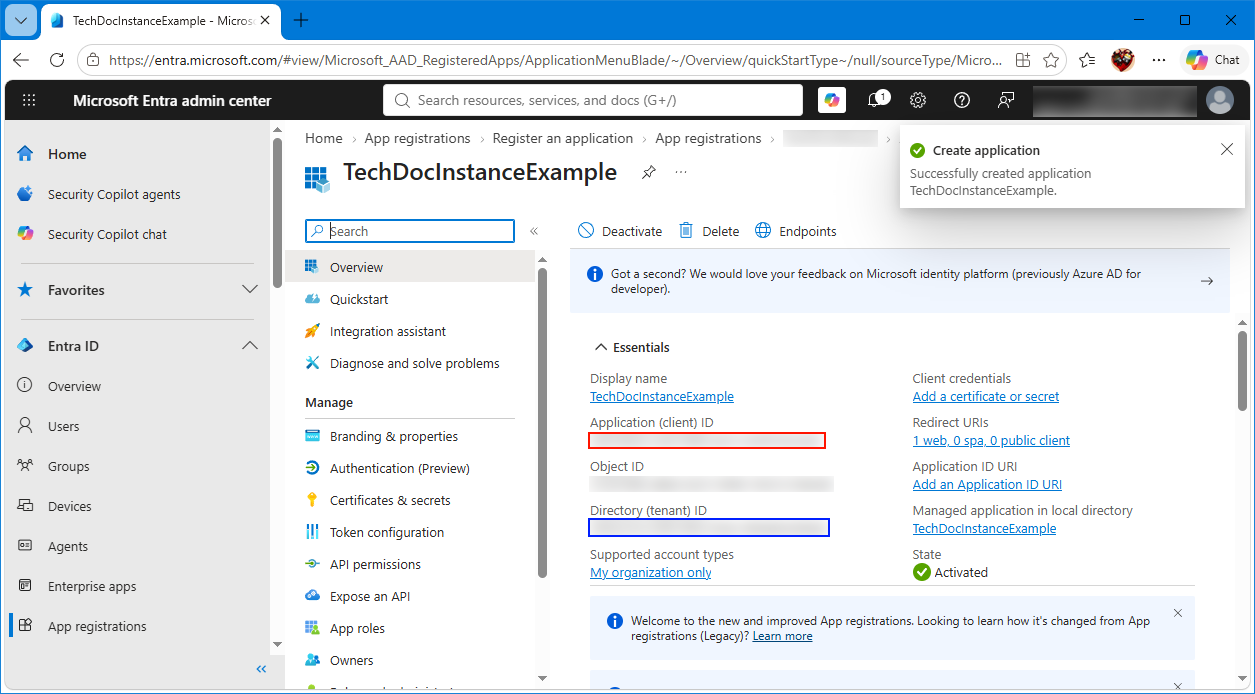
- Next, the security mechanism(s) needs to be configured on the application registration. Click the "Add a certificate or secret" link under Client credentials.
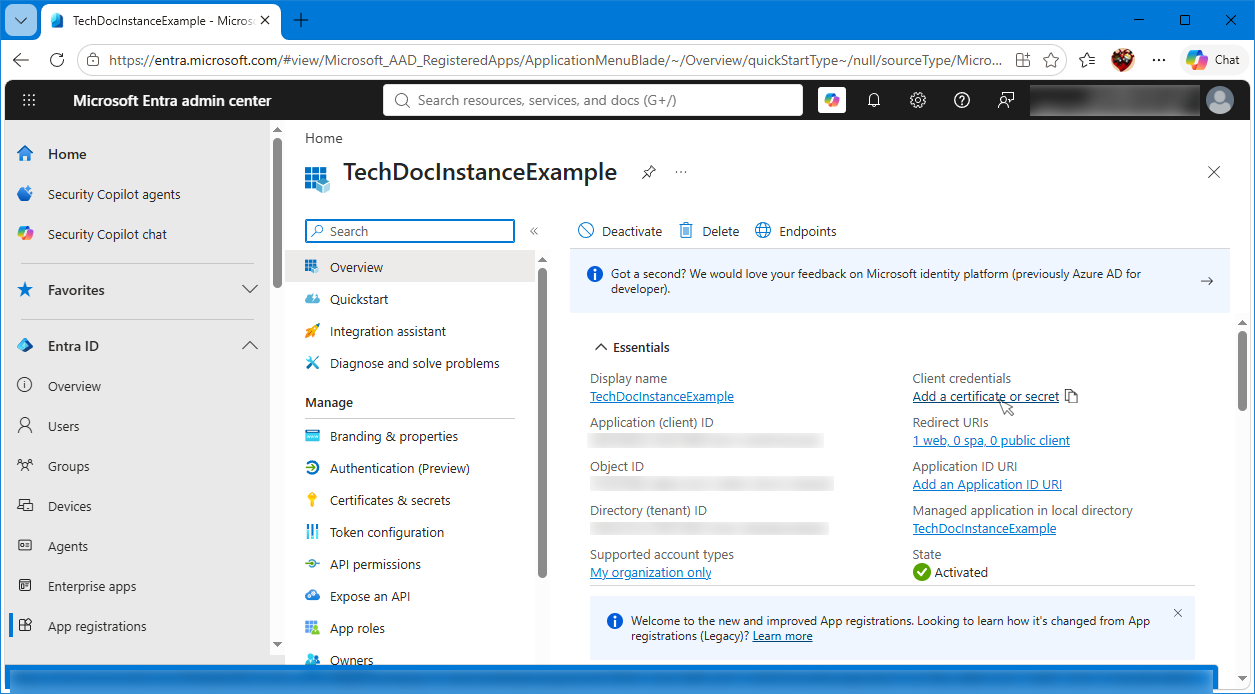
- On the Certificates and secrets page, you can set up either a shared secret or certificate for authentication. Optionally, both of these mechanisms can be set up if needed, though TechDoc only allows one to be used per authenticator. If both are desired, two different TechDoc OIDC authenticators must be set up. While shared secret works fine, it's often more preferred to use certificates. Follow the step(s) below for the mechanism(s) you wish to set up.
Shared Secret
- To configure a shared secret, click the "New client secret" link on the bottom of the page under the Client secrets tab.
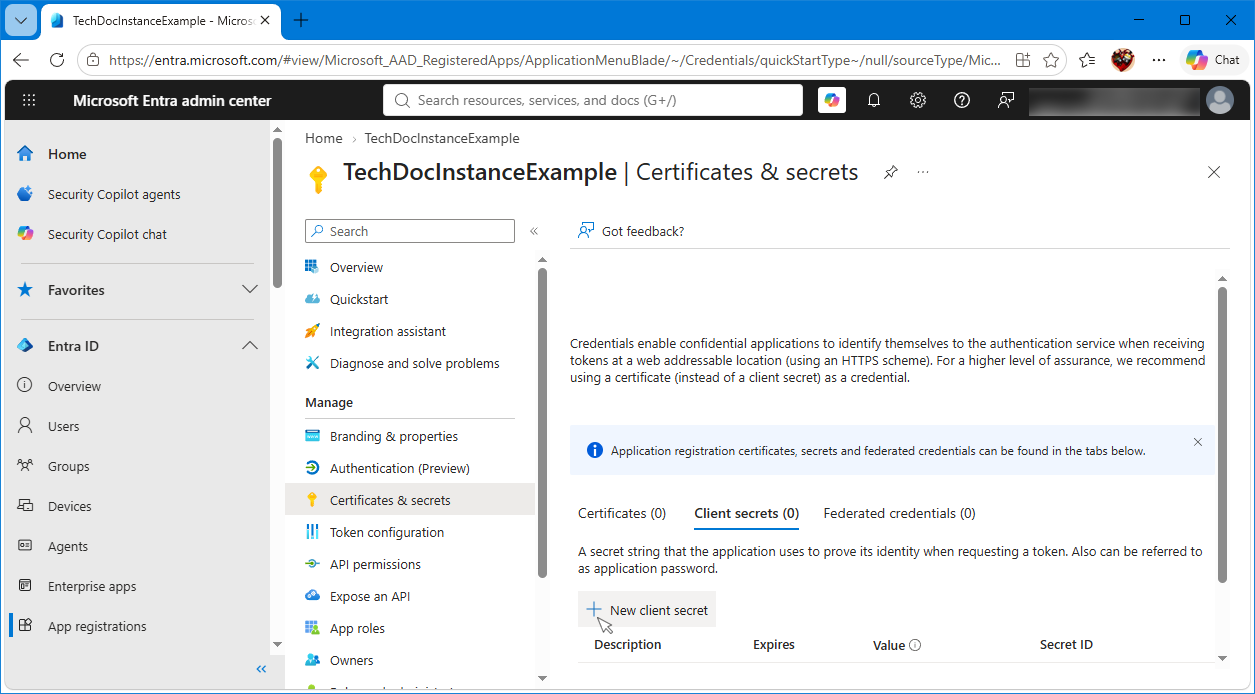
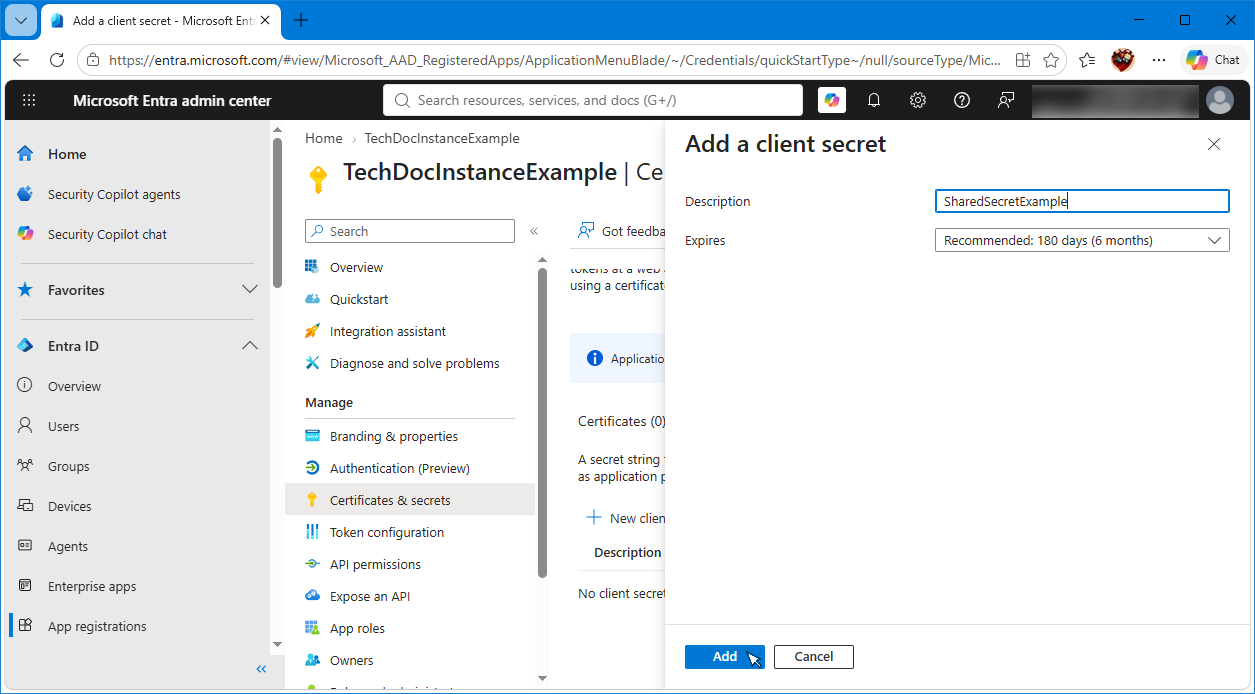
- Enter a description for the secret and adjust the expiration days if needed. Click the Add button to generate the new secret.
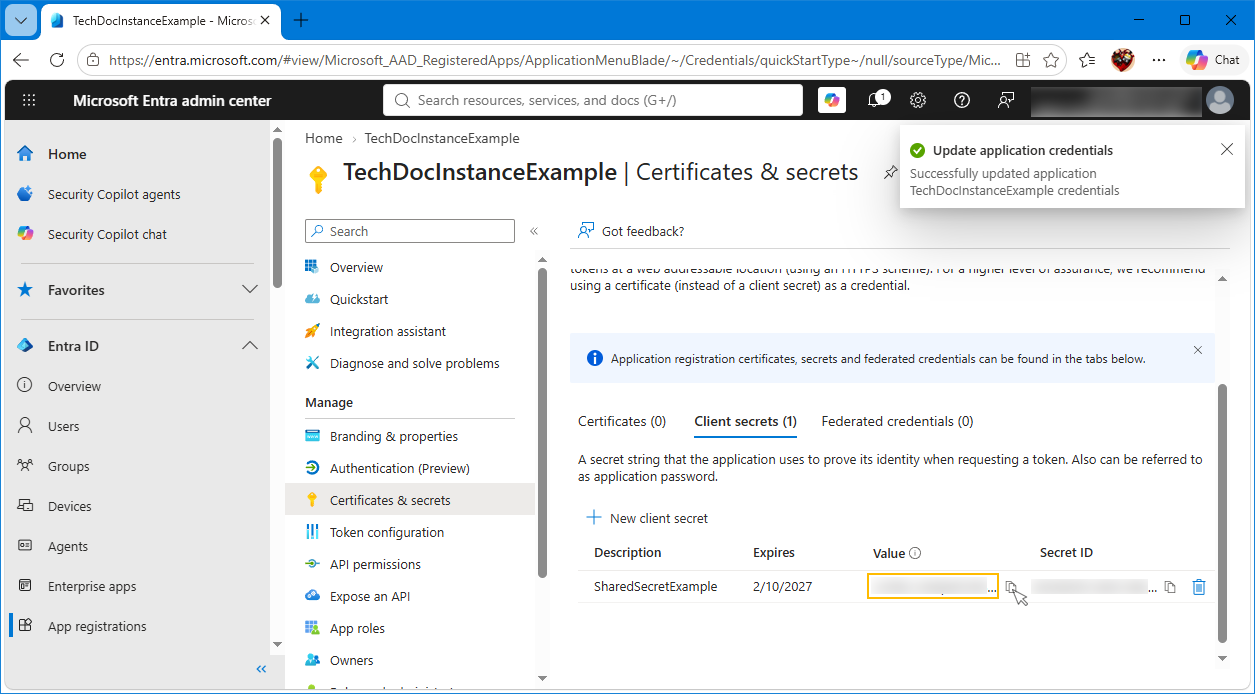
- After the new secret is generated, you will see it listed in the Client secrets section. Write down the secret value in your text file by clicking the copy icon next to the value (shown in the orange box below) and then pasting it into your text file. This value will be needed later when configuring the TechDoc OIDC authenticator.
Certificate
- You'll first need to obtain the public/private key pair you want to use. If you do not have the key pair yet, you can create a temporary key pair using openssl with the following options:
openssl req -x509 -nodes -days 120 -sha256 -newkey rsa:4096 -keyout idp-metadata-entra-private.key -out idp-metadata-entra-public.crt -subj "/CN=YOUR_TECHDOC_INSTANCE"
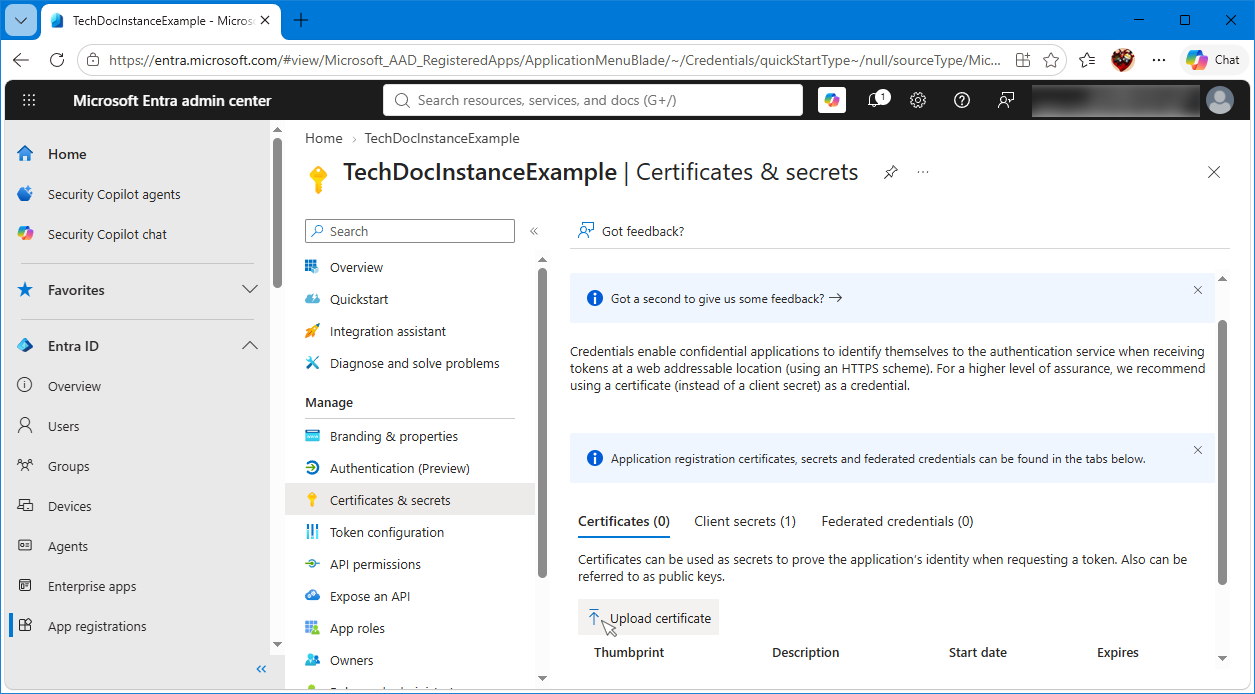
This generates both an x509 private key (-keyout idp-metadata-entra-private.key) and public key (-out idp-metadata-entra-public.cert), without a passphrase (-nodes) with an expiration set to 120 days from now (-days 120) specifically using SHA-256 (-sha256) with an RSA key size of 4096 (-newkey rsa:4096) and a subject using the same host name used for our TechDoc DM or SM (-subj "/CN=YOUR_TECHDOC_INSTANCE") replacing YOUR_TECHDOC_INSTANCE with the fully qualified hostname of your TechDoc DM or SM as before. A few things to note, the key must be set to require no pass phrase, the key must use SHA 256 and RSA. A smaller RSA key size (such as 2048) may be used if needed, but we suggest the max of 4096. Also, the expiration days should match what your organization typically uses. Additionally, you probably need to generate/obtain a fully qualified certificate instead of using a self-signed cert as in this example. This openssl example is meant only to get you up and running. Most organizations should already have access to the certificates they intend to sign with. - To configure a certificate, click the "Upload certificate" link on the bottom of the page under the Certificates tab.
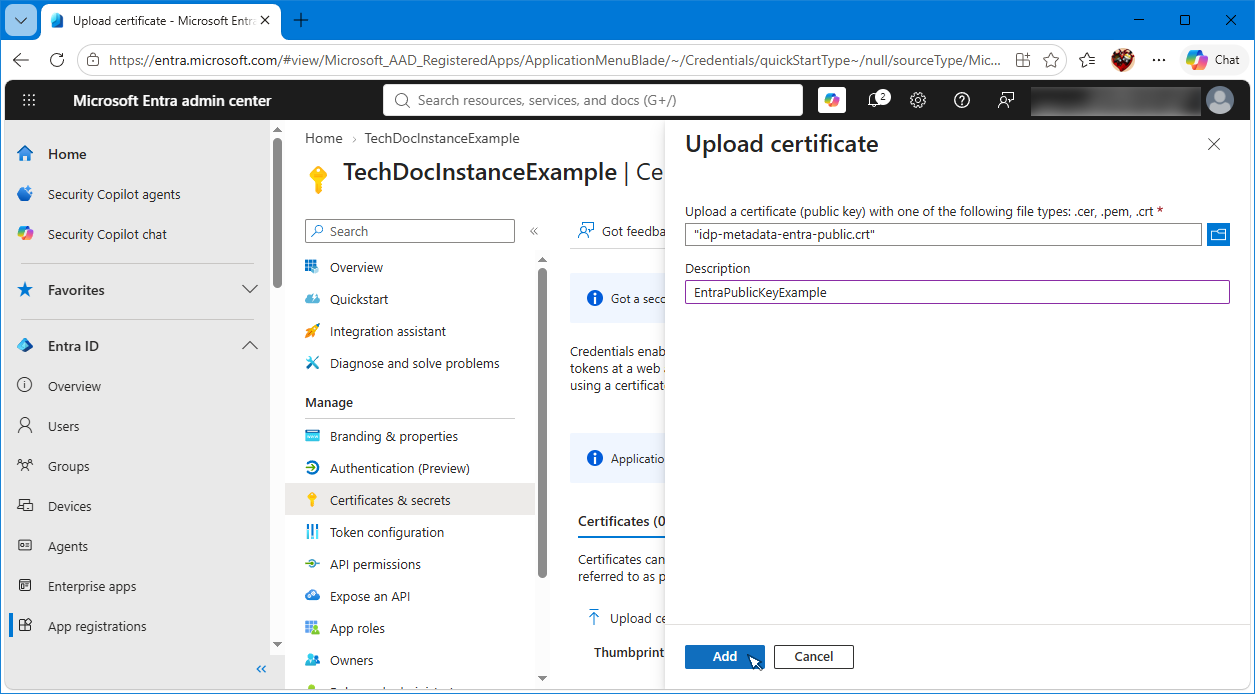
- Navigate to and select the public certificate key file, and enter a description. Click the Add button to upload the certificate.
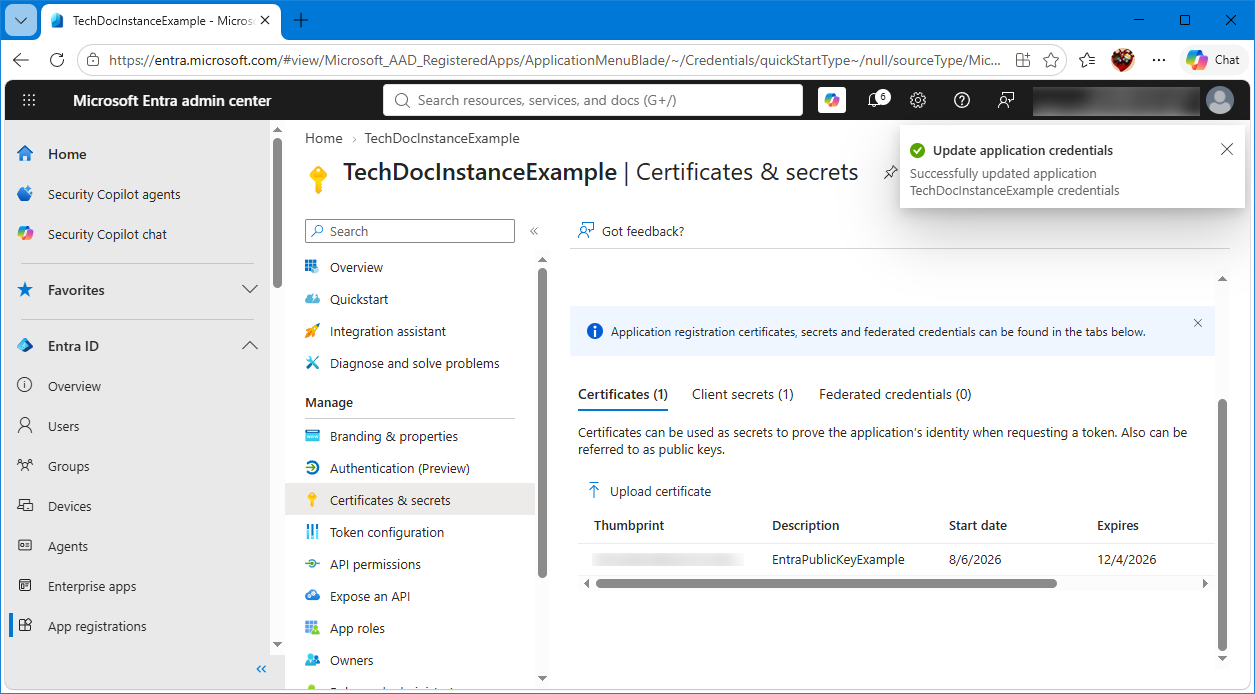
- After the certificate is uploaded, you will see it listed in the Certificates section.
- To configure a shared secret, click the "New client secret" link on the bottom of the page under the Client secrets tab.
- This completes the Entra side of the configuration, but before we move on to the TechDoc configuration we need to save a copy of the Entra OIDC IDP metadata. Open a web browser so we can save a copy of the Entra OIDC IDP metadata to a file for TechDoc. You should be able to enter in the address bar:
https://login.microsoftonline.com/{tenant-id}/v2.0/.well-known/openid-configuration
replacing {tenant-id} with the tenant-id noted in your text file earlier. This should result in a screen that looks like this:
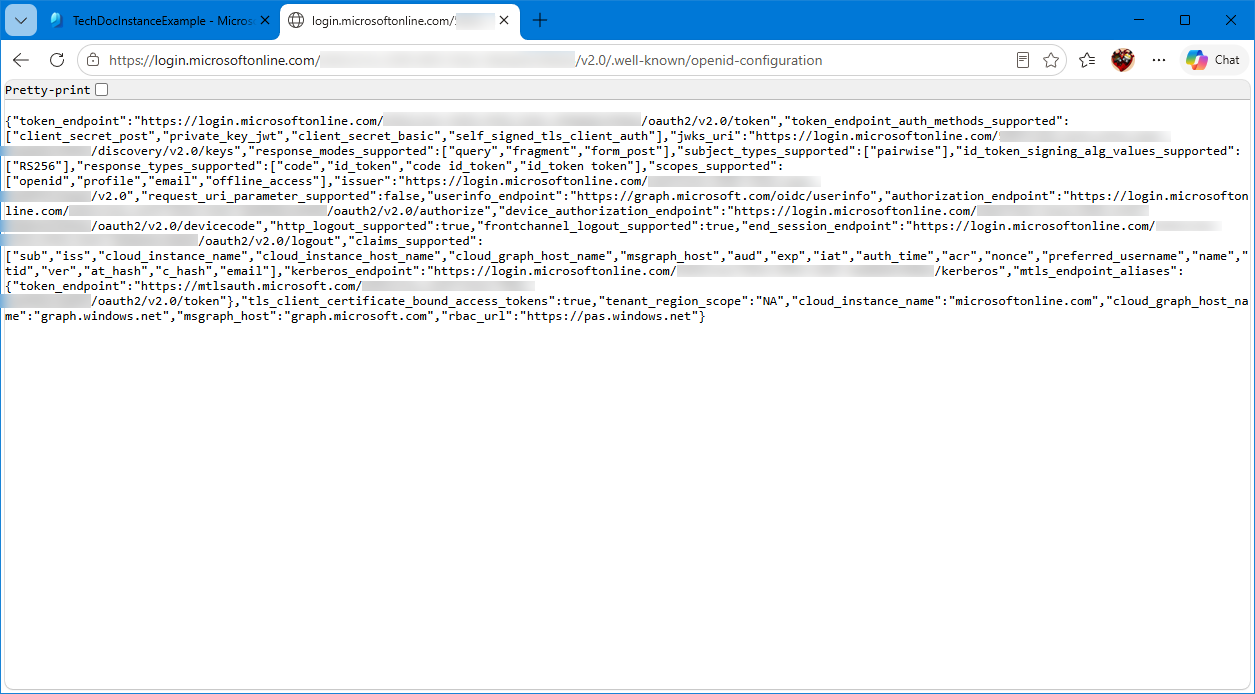
- Right click and select Save as... and save the metadata to a file in your TechDoc/etc folder; we named ours idp-metadata-entra.json.
Setting up an OIDC Authenticator in TechDoc
- Open a web browser and navigate to your TechDoc DM or SM (we'll be using a DM for this example), log in as an Admin, and click on the Admin link on the top menu bar.
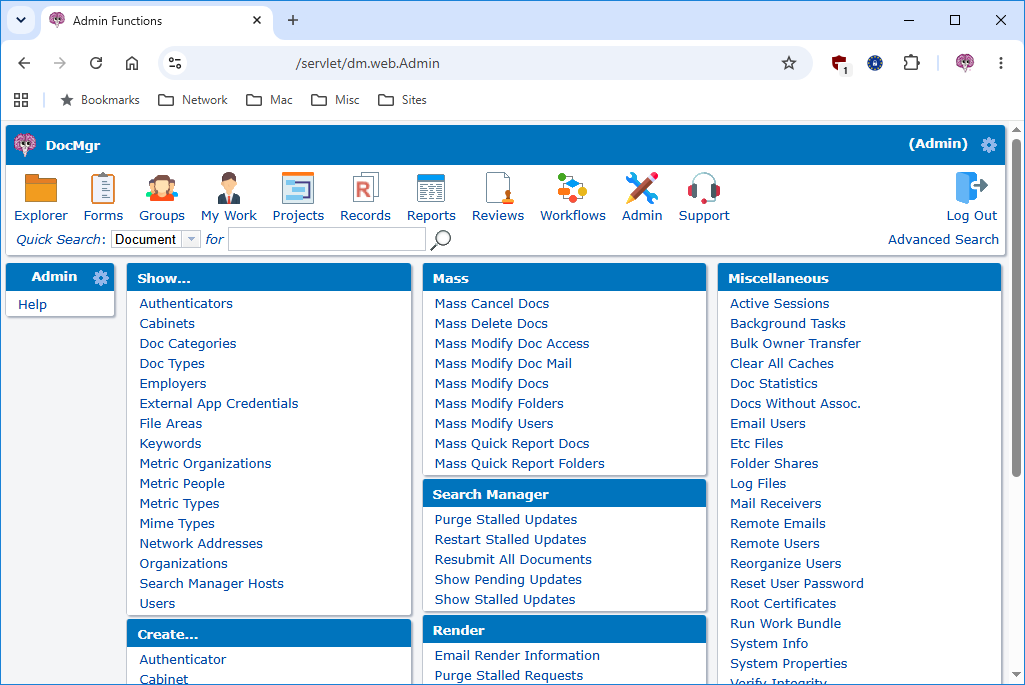
- On the Admin screen, click the Authenticator link under the Create... to start the creation of the TechDoc OIDC authenticator.
- On the Create Authenticator screen, enter a name for the authenticator and select OIDC from the drop down menu.
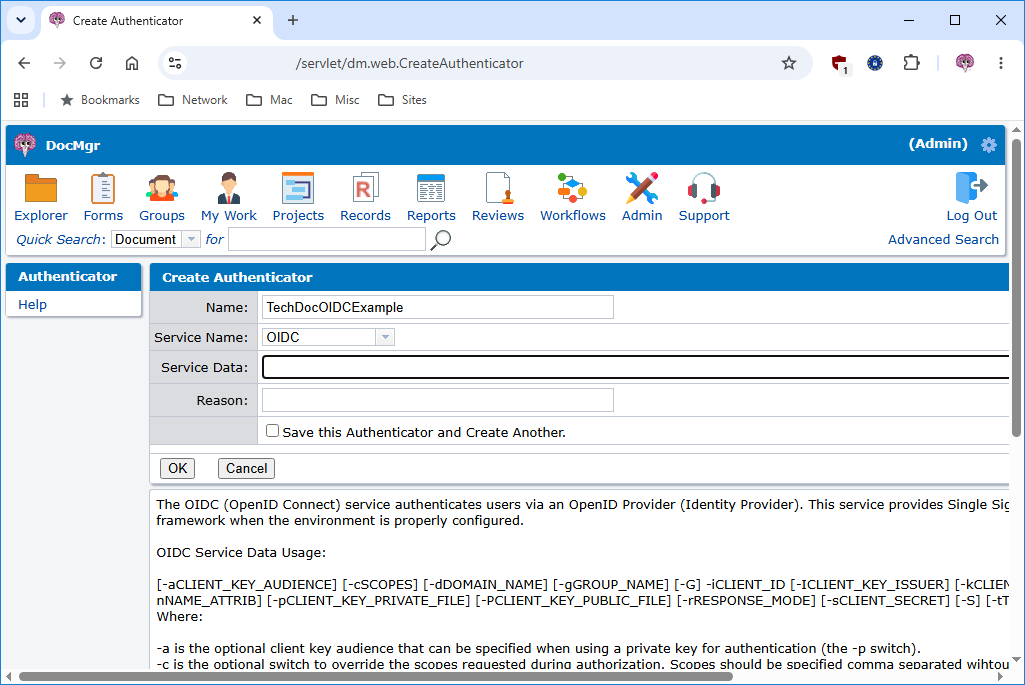
- For the service data, we'll need to specify one of the following service data lines. The first line is an example of how to configure an authenticator to use a shared secret:
-midp-metadata-entra.json -iCLIENT_ID_HERE -sSECRET_HERE
where -m specifies the name of your metadata file, -i specifies your client identifier, and -s specifies your shared secret. The client id and secret should be in the text file from earlier; replace CLIENT_ID_HERE and SECRET_HERE with the corresponding values from your text file. Optionally, you could also specify a service data string like the following to configure certificate based authentication:
-midp-metadata-entra.json -iCLIENT_ID_HERE -pidp-metadata-entra-private.key -Pidp-metadata-entra-public.crt
where -m specifies the name of your metadata file, -i specifies your client identifier, -p specifies the name of the private key file in your TechDoc/etc folder, and -P specifies the public key file in your TechDoc/etc folder. The client identifier should be in the text file from earlier; replace CLIENT_ID_HERE with the client id in your text file. The names of your public and private keys may vary, and it's up to you to either generate these keys (as shown earlier) or obtain a public/private key pair from your organization. - Once you've entered your service data, click the OK button to complete the creation.
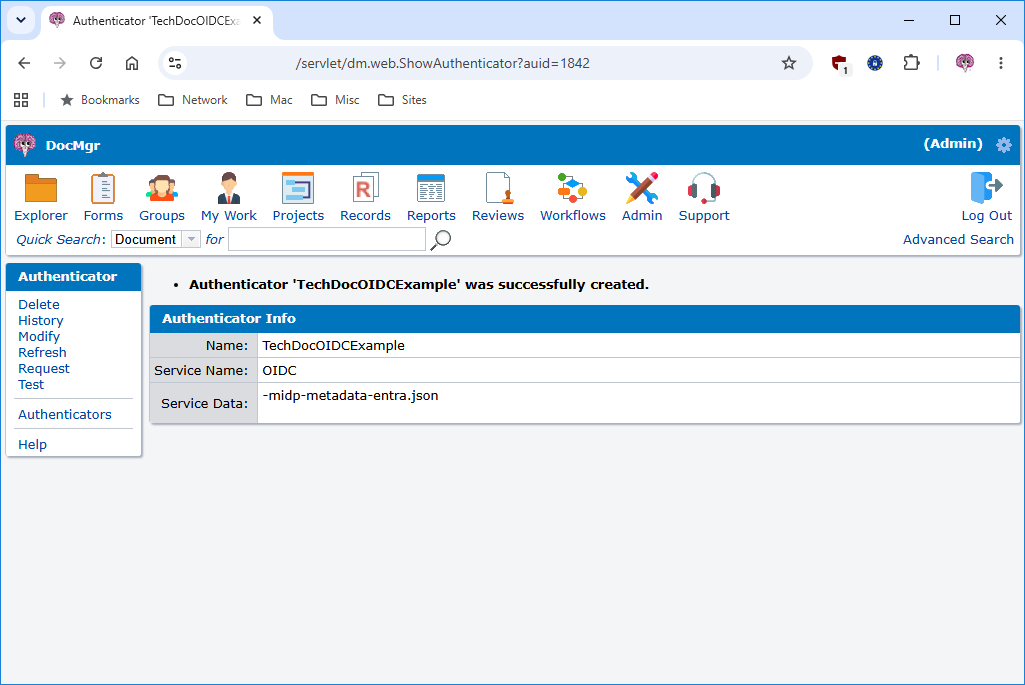
- You may now click the Test link on the side menu, and then click the Test using... button to test your authenticator.
- You should see a list of user attributes returned that resembles the screenshot below. Make sure you see the entry named email. This claim is the default one that will be used to map the Entra AD user account email address to a TechDoc account. If a different claim is to be used, make sure that claim appears in the list. You may need to add the -n switch to your authenticator to specify the name of the specific claim you wish to use to identify users.
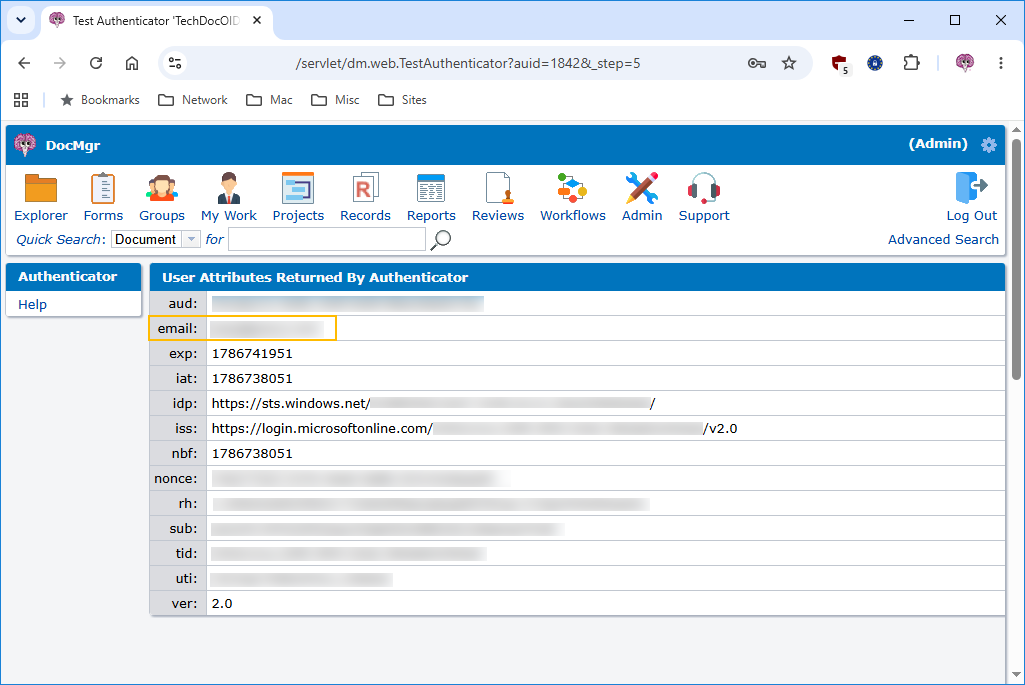
- If everything looks good, your configuration is complete! You are free to begin creating users using this authenticator by selecting it from the list on the create/modify user screen and entering their Entra AD user account's email address (their email or whatever other unique identifier you've chosen to use) in the field next to the authenticator.
One final note: If your plan is to migrate an existing SAML Authenticator to use OIDC, you can perform the following steps to transition the existing SAML authenticator over to using OIDC and all users assigned to that authenticator will now be using OIDC to access TechDoc.
- Thoroughly try out the test OIDC authenticator that you set up above to make sure you're confident that it is working correctly.
- Record the current SAML authenticator's settings somewhere; particularly the Service Data string.
- Modify the current SAML authenticator, change its Service Name from SAML to OIDC, copy the Service Data string from the test OIDC authenticator that you set up to here, enter a reason, and click OK.
- Now test your newly converted authenticator to make sure it's working properly as an OIDC authenticator.
- If there are any problems, you can always modify the authenticator and change the Service Name back to SAML and change the Service Data string back to what you recorded in step 2.
- Once happy with the SAML to OIDC migration, you can delete the test OIDC authenticator if you no longer want it around.
Product Type: